맥북프로 speck 15인치 스마트쉘 케이스 투명 


오월달에 중고로 구입한 맥북프로 2012 15인치 (md103),  전신보호필름이 있었으나 ssd 추가 및 세컨베이 작업으로 보호필름이 너덜해졌다. 


너덜해진 필름 대신 하드쉘 케이스를 사려고 하니 국내 오픈마켓 및 쇼핑몰등등에서는 speck 15인치 제품중 레티나만 있고 그냥 맥북프로는 재고가 없었다. 


speck에서 파는 제품을 좀알아보니깐

speck의 맥북프로 케이스는 크게 두가지로 분류된다.  


- 스마트쉘 케이스 (SmartShell cases for MacBook Pro)

- 시스루 케이스 (SeeThru cases for MacBook Pro)


이렇게 두가지가 있는데 제품의 굵기 차이다. 스마트쉘이 더 얇다. 

그외 satin, neon 등의 재질 및 색깔차이로도 분류되며


더 자세한건  speck사의 제품구매페이지에 잘 나와있다. 참고

http://www.speckproducts.com/macbook-cases/macbook-pro/smartshell-for-macbook-pro.html


국내에는 파는곳이 없어 해외쪽으로 구입을 알아봤는데 다들 정품가격($49.95)에서 고만고만했다. 

결국 싸게 새제품으로 이베이에서 바이잇나우했으나, 받아보니 깨진게 도착함.. -_-;;


배대지에서 배송보상받고 다시 이베이에서 지름..  낙찰은 $15 + 미국내배송비 $10 =  $25 + $9.9(한국배송비) 도합 $34 ㅎㅎ


결국 오늘 받게되었다. 


제품 포장  안쪽에 종이하나가 들었는데 장착 가이드 그림이 그려져 있다.


뒷면 


장착샷


충전케이블 간섭 없음


상판장착시 보호필름은 제거 하지 않았는데 잘 맞았다.


하판조립시에는 보호필름 떼지 않고 장착하니 가운데가 약간 뜨는게 보여 보호필름 제거하고 장착하니 정말 just하게 맞음 ㅋㅋ


고정엣지가 있어서 케이스가 고정됨


하판도 역시 저런 고정엣지


베터리체크버튼도 잘 눌림 


하판 고정엣지


상판은 보호필름 제거하지 않고 장착함


적용완료!


Posted by 에시드 :
product_logo

Winclone

Overview

Winclone allows you to resize your Bootcamp partition. This process consists of shrinking the size of the current bootcamp partition, creating an image of the current bootcamp partition, deleting the current partition, creating a new partition with a new size, then restoring the Winclone image.

BACKUPS

Make sure you have a good file based backup of all data on all partitions prior to starting these steps. While Winclone has been tested in a variety of setups, there is still a possibility of data loss due to hardware or software issues during the clone and restore process.


1. Open Winclone

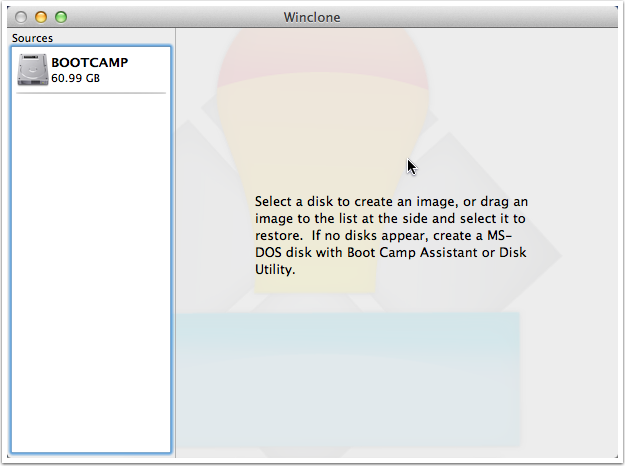
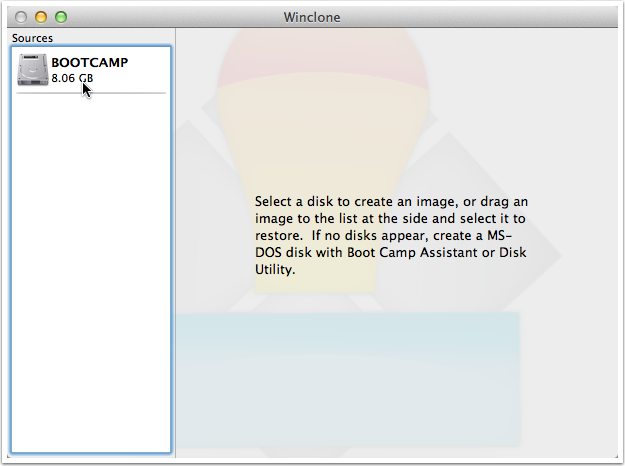
Launch Winclone, and your current Windows partition should appear in the Sources list.


2. Shrink Filesystem

If you are going to be restoring Windows on a partition that is smaller than the current partition, you need to shrink the filesystem first. If not, skip to step 7.

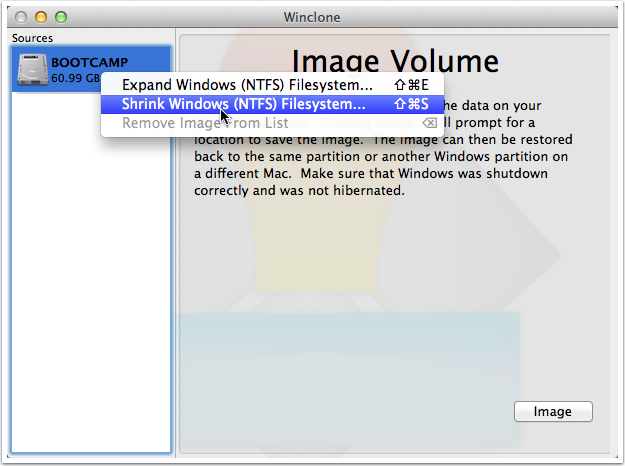
To shrink the NTFS filesystem, control-click on the bootcamp volume and select Shrink Windows (NTFS) Filesystem.


3. Resize Confirmation

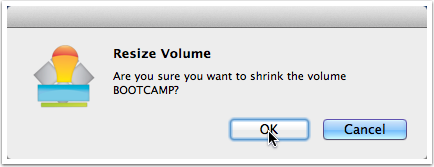
Verify that you want to shrink the filesystem.


4. Shrink Operation

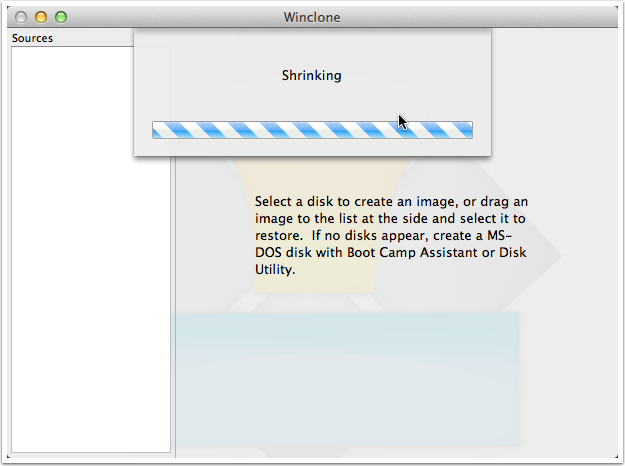
The filesystem will be reduced to the smallest size possible.


5. Resize Progress

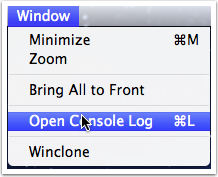
If you want to see the resizing progress, select Windows->Open Console Log.


6. Resize Verification

After the bootcamp partition has been resized, you will see the new filesystem size. Note that this is the smallest partition size available and you'll need a bootcamp partition that is the same size or larger to restore the filesystem.


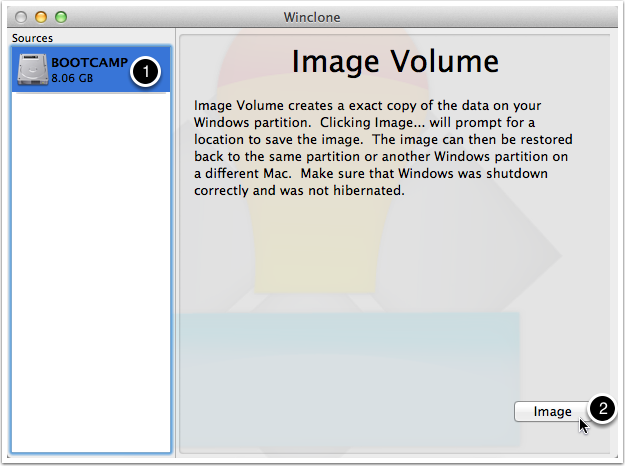
7. Imaging the Bootcamp Partition

You are now ready to create an image of the bootcamp partition.

  1. Select the Bootcamp partition.
  2. Click Image.

8. Memory Caches

Windows keeps a large file called a pagefile.sys on the Bootcamp partition. This file takes up a lot of space and is recreated on startup. However, if a drive is already failing or has corruption on it, deleting files may cause issues. Select to Keep Cache Files or Remove Memory Cache Files.


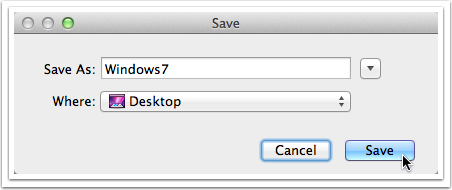
9. Save

Give the image a name, and save it to a Mac formatted drive. In this example, the image is saved to the Desktop.


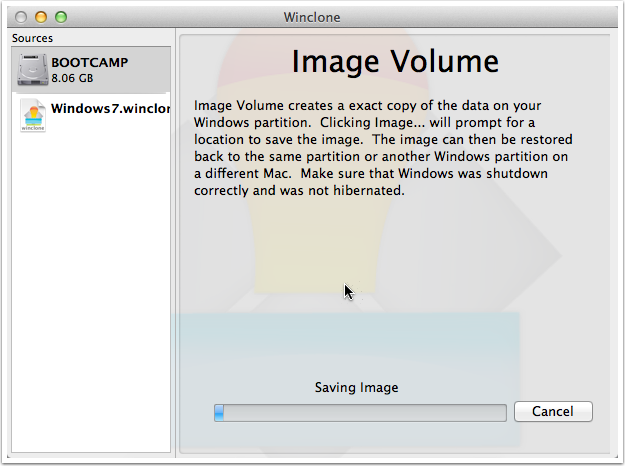
9. Image Creation

The Winclone image will now be created. Depending on the size of your bootcamp partition, this may take a while.


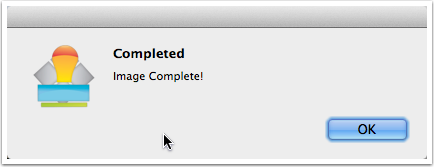
10. Completion of Image Creation

Once the imaging process completes, you'll see a confirmation.


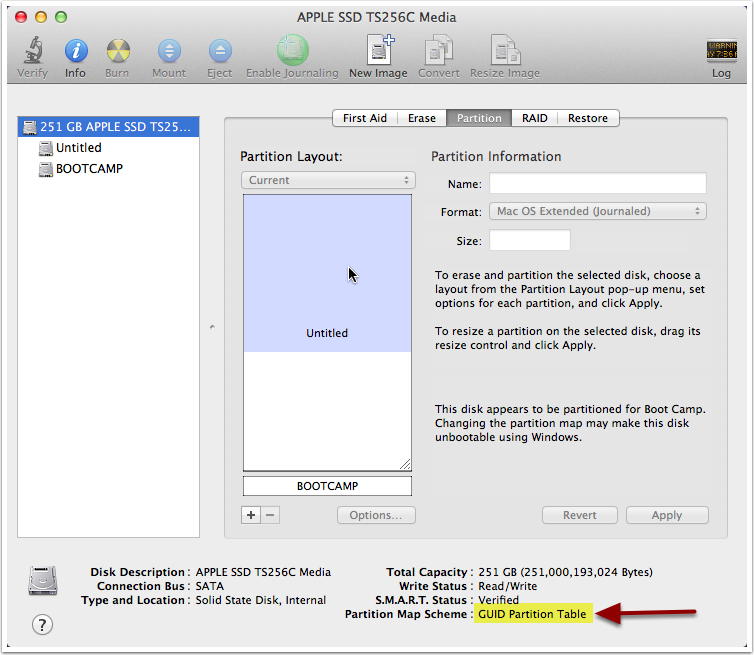
11. Removing and Creating a new Bootcamp Partition

Open Disk Utility in the Utilities folder, select the drive and then select the Partition tab.


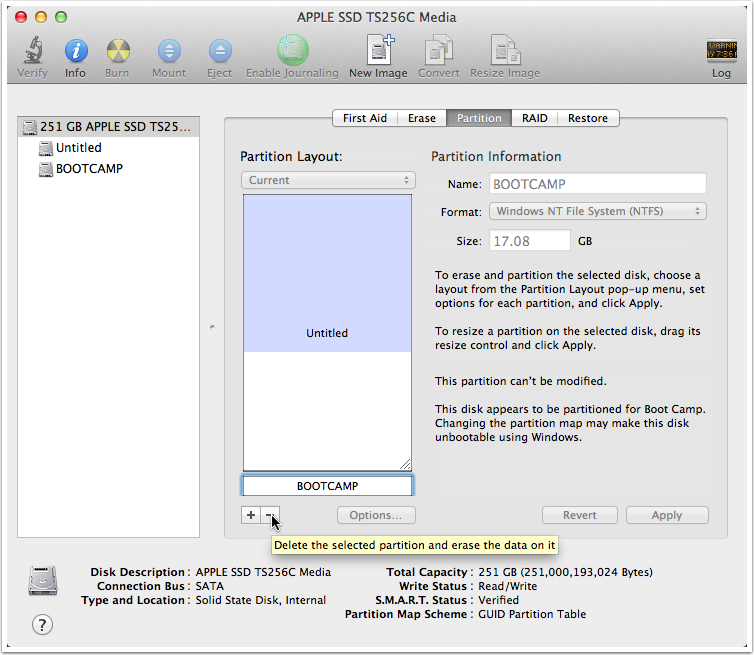
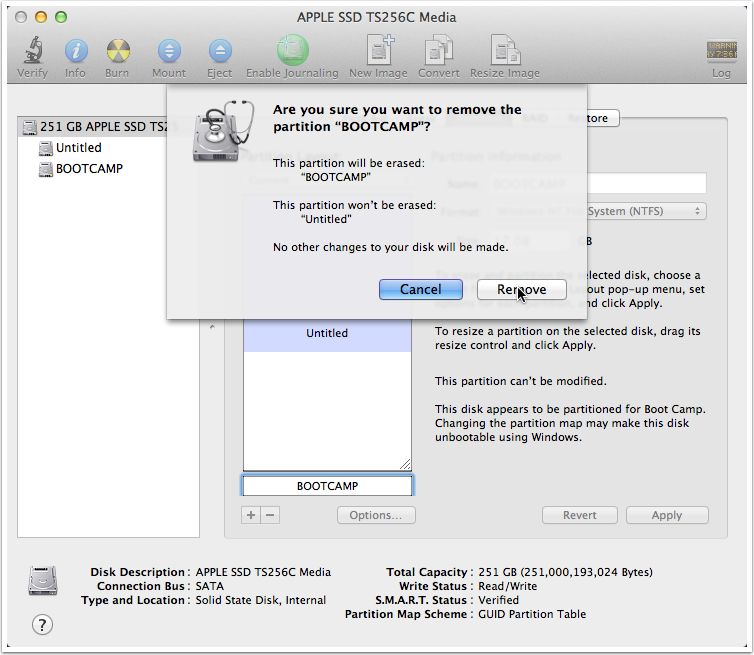
12. Delete BootCamp Partition

MAKE SURE YOU HAVE A FILE BASED BACKUP OF YOUR WINDOWS PARTITION PRIOR TO THIS STEP. This will destroy any Windows data on your bootcamp partition, and if you are unable to restore the image you created in the prior steps, all data will be lost. Make sure you have a file based backup of all files on the disk prior to this step.

Remove the prior Bootcamp partition by selecting it pressing the "-" button.


13. Remove Partition

MAKE SURE YOU HAVE A FILE BASED BACKUP OF YOUR WINDOWS PARTITION PRIOR TO THIS STEP. This will destroy any Windows data on your bootcamp partition, and if you are unable to restore the image you created in the prior steps, all data will be lost. Make sure you have a file based backup of all files on the disk prior to this step.

If you have a good backup, click Remove.


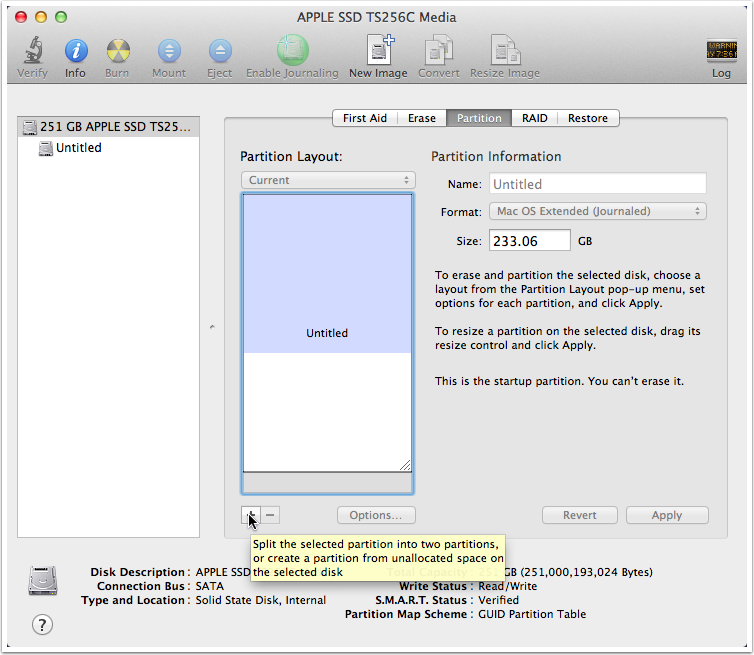
14. Create New Windows partition

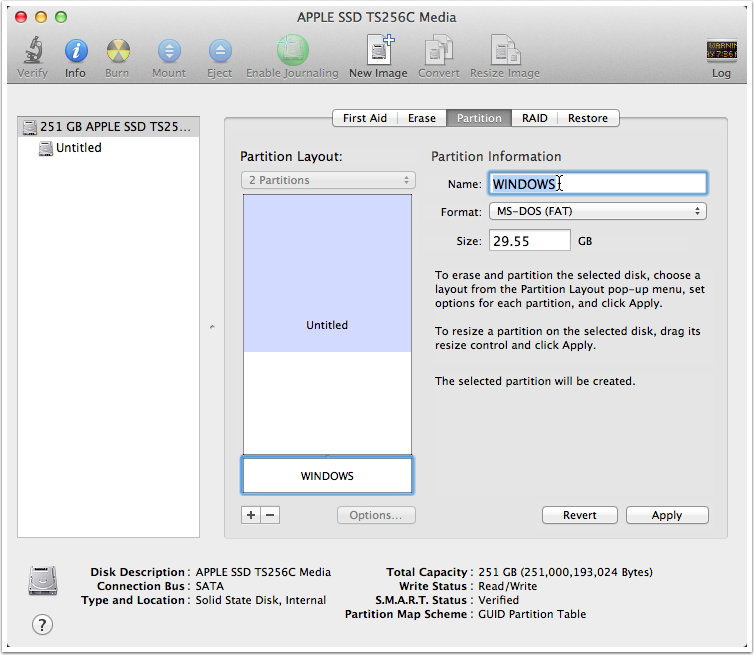
To create a new Windows partition, click +.


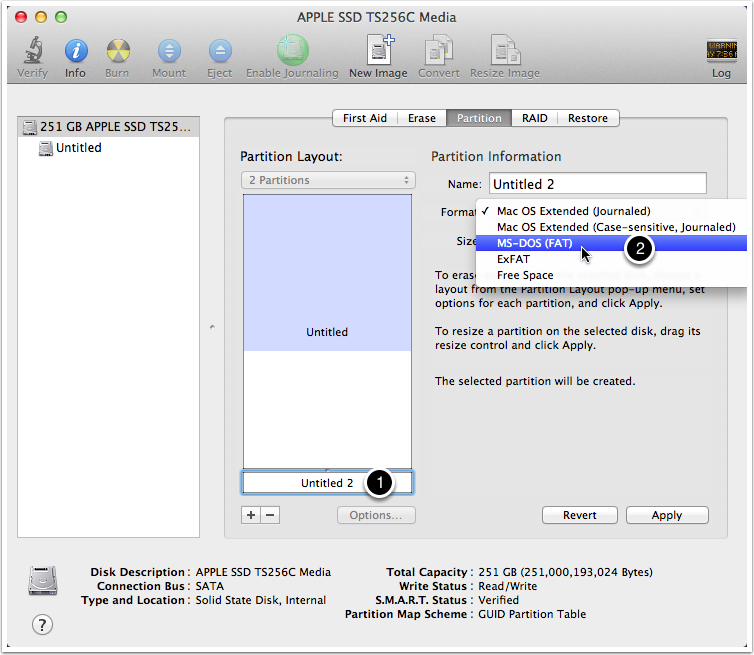
15. Set Filesystem Type

In order for Winclone to see the partition, it must be formatted as FAT.

  1. Select the new partition.
  2. Set the format to MS-DOS (FAT)

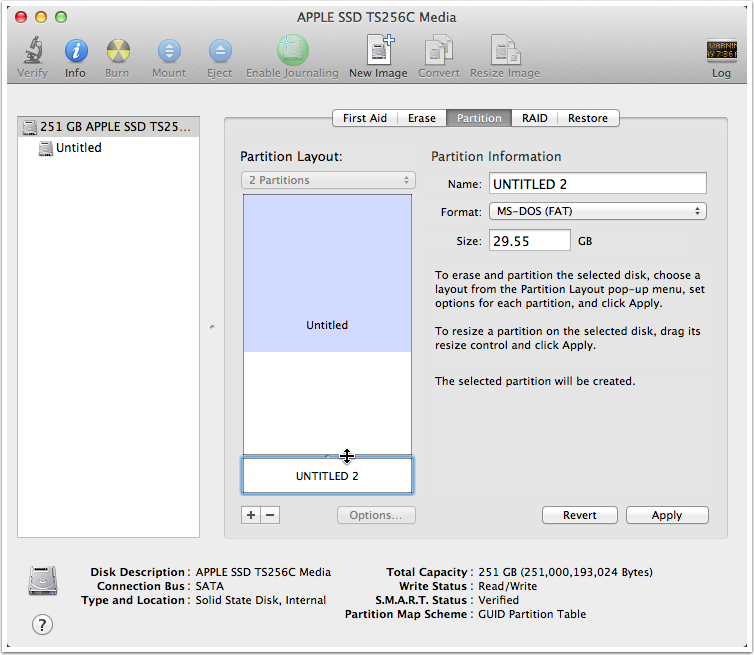
16. Resize Partitions

You can now drag the divider between the partitions to set the size you would like for the Windows partition and the Mac partition.


17. Bootcamp Partition Name

Give the new partition a name to easily recognize it in Winclone.


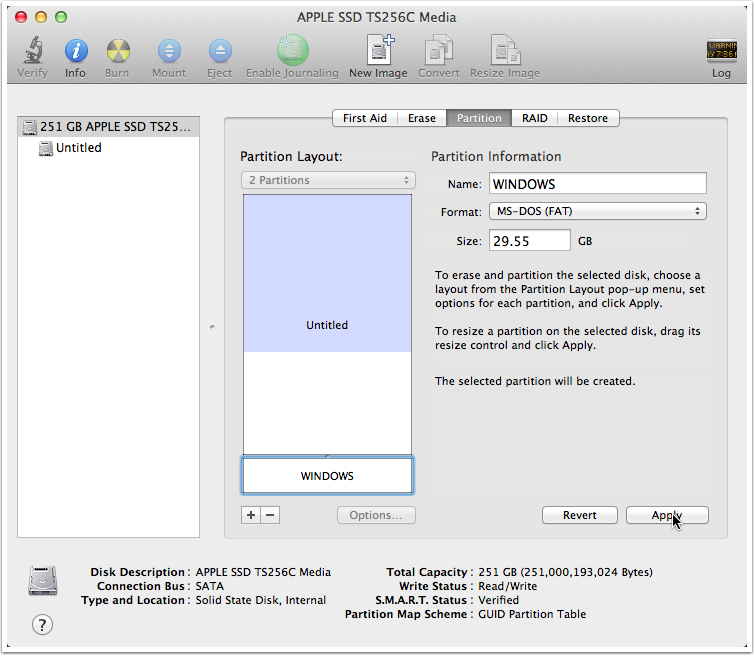
18. Apply Changes

Click Apply to resize the Mac partition and create a new Windows partition.


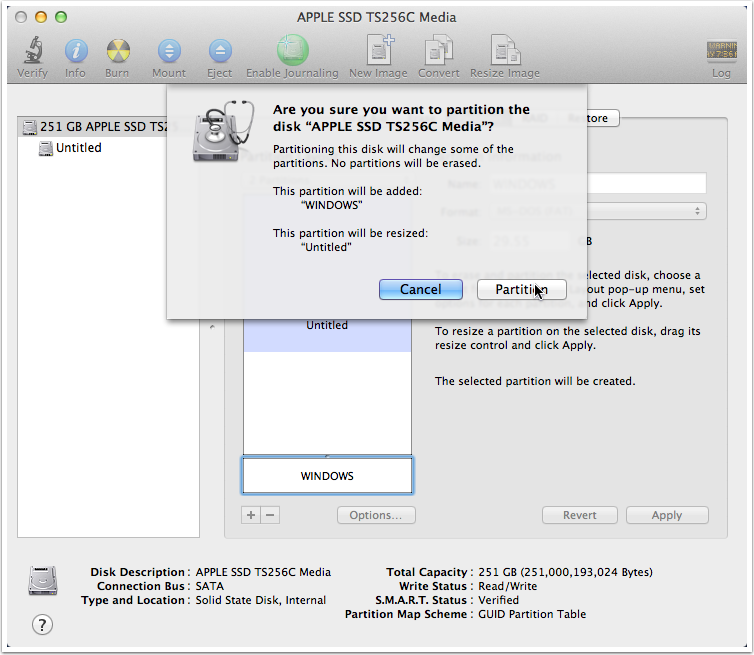
19. Verification

Disk Utility will verify the operations that it is performing. Make sure that the Mac partition is being resized and that the bootcamp partition is being added. If this is correct, click Partition.


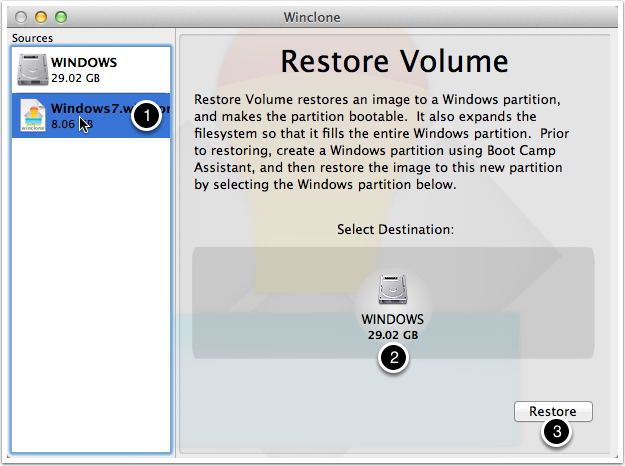
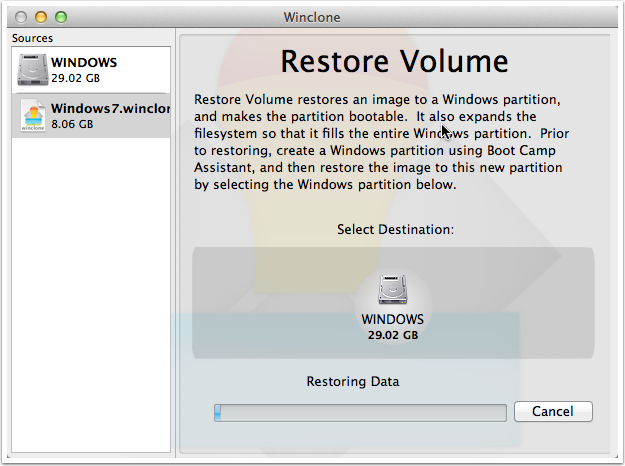
20. Restoring the Winclone Image

Back in Winclone, select the Winclone image you created, select the bootcamp volume, then click Image...You do not need to quit and relaunch Winclone, as it will detect any new partitions.

  1. Select Image
  2. Select Bootcamp partition
  3. Click Restore

21. Verification

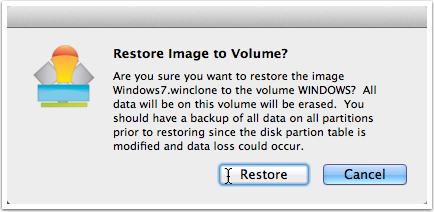
You will be asked if you want to restore. Verify that the correct partition is being restored to, and click Restore.


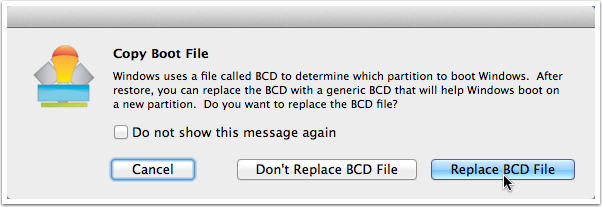
22. Copy Boot File

In Windows Vista and Windows 7, Windows uses a boot file called BCD to determine which partition is used to boot. If you did not do any custom BCD configuration, select "Replace BCD".


23. Restoring Status

The restoration will start. It may take a while depending on the size of the image. You can see detailed information on the progress by selecting Window->Show Console Log.


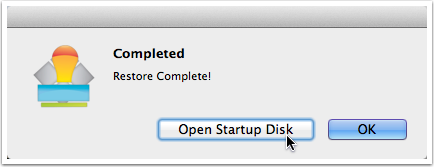
24. Completion and Startup Disk

Once restoration is complete, click Open Startup Disk to select the Windows partition to boot into.


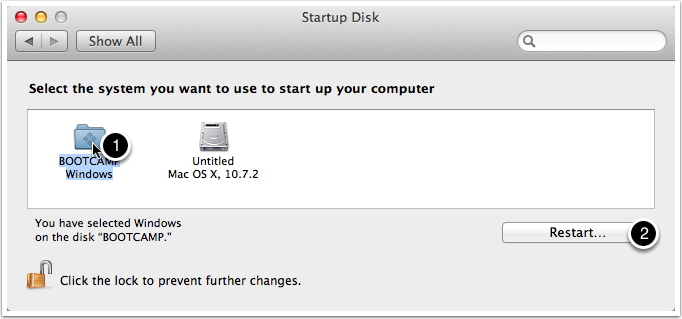
25. Startup Disk

Select your bootcamp partition.

  1. Select the Windows folder.
  2. Click Restart

Once rebooted into Windows, if the filesystem expanded, a disk check will be performed, and then Windows will reboot. After this reboot, you'll have a fully restored system.


Posted by 에시드 :

20140513 중고 직거래로 구입

appleCare 2017년 01월 06일 만료


SSD 840pro 256GB 장착 및 기존HDD 세컨베이 작업

16GB 램 업글 완료


Posted by 에시드 :

keyboard sticker

2014. 5. 16. 00:44 from hardware

각종 프로그램 숏컷 가이드 키보드 스티커


가격은 $6.5 정도임


예전에 프로툴즈 쓸때 맥키보드에 고이고이 붙였던... 기억과 함께 

사볼까 하는 프로그램 숏컷 가이드 스티커를 정리해봤다. 


이외 각종 프로그램들은 아래 URL 참고


http://www.4keyboard.com/

http://www.vivakeyboard.com/


전부 가로 11mm / 세로 13mm 규격


Eclipse keyboard sticker

http://www.4keyboard.com/eclipse-keyboard-sticker-p-842.html


-- 사실 이클립스의 숏컷들 가이드 단축키( alt + shift + l ) 가 있고 그리고 잘쓰는 숏컷들은 기억하고 있지만 잘 안쓰는 숏컷들을

    알고싶을때 유용할 것 같다. 하지만 지금 사용하는 키보드가 일루미네이트 키보드인건 함정; 

    이외 인텔리J, 비주얼스튜디오, xcode 용도 있음.

-- 몇개 사서 지인들 선물해주기 좋을것 같다. (엑셀, 워드등)


Vi and Vim editor keyboard sticker

http://www.4keyboard.com/vi-and-vim-editor-keyboard-sticker-p-350.html

-- 역시 vi, vim를 자주쓰는데 있음 좋을것 같다. :)


Native Instruments TRAKTOR PRO2 keyboard stickers

http://www.4keyboard.com/native-instruments-traktor-pro2-keyboard-stickers-p-570.html


-- 에이블톤 및 로직 프로 등등 각종 프로그램 숏컷도 있음

-- 이건 정말 디자인이 안습해서 살 엄두가 안난다. 맥북키스킨을 살려고함.. ㅋㅋ 

    http://kbcovers.com/  

    https://store.djtechtools.com/keyboard-covers.html 


Posted by 에시드 :


이번에 구입한 사파이어 R9 290X Tri-X OC (국내유통 이엠텍) 비레퍼


8800GTX 계속 사용하다 냉납현상이 점점 심해져 (냉납 다리미 신공으로 고쳐봤으나 역시 임시방편, 몇일뒤 재발한다) 

구입하게 되었다.


8800GTX는 봉인하기 전에 수리 한번 맡길 예정이다. 아마 영구봉인되겠지;;


CPU및 메인보드는 그대로인 상태에서 그래픽카드만 교체를 염두에 두고 가격대비 GTX460이나  GTX480 중고를 생각했으나,

각종 온라인의 290 관련 벤치마크를 참조하니 780TI 및 titan의 퍼포먼스와 비등하다는 결과를 참고, 290X 플래그쉽을 사용하기로 하고 구입하게 되었다. 그리고 베틀필드4도 구입의 결정적 원인..


기존 데스크탑 사양

CPU : Q9650  3.0G  (775소켓) OC 3.6G(FSB 400)

RAM : DDR2 6400U 2G X 4ea samsung

M.B : ASUS P5K-E (p35칩셋)

P.S : superflower 600W

VGA : leadtec winfast 8800GTX 768MB

HDD : HDD임;;


사양을 적어보니 업그레이드가 필요하다고 생각된다;;

물론 업그레이드가 아닌 CPU, RAM, M.B 전부 바꿔야 하는...


자주하는 게임이

스타크래프트2 군단의심장, 아케이드 스랜디

베틀필드4는 어제 설치했다!


해상도는 1920X1020


3DMark 11 점수


내심기대하였으나 CPU가 몇세대전이라 물리점수 및 컴바인드 점수 4000점대로 상처입었음

그래픽카드 스코어는 15000점대로 290X 관련 3DMark11벤치에서 보았던 익숙한 점수가 나옴


- E 기억이 안나는데 10000점 이상이었던

- P9000점대

- X3000점대


첫실행


스타크래프트2 는 최고옵션으로 실행시 평균 30프레임정도 나온다. 게임을 못할 정도는 아니나 쾌적하진 않다,

프레임드랍이 심함, 눈물을 머금고 옵션타협


검은곳에서 찾아보니 VGA보단 CPU가 받춰줘야 된다고 하는데,

하지만 동급그래픽카드조건에 다른 상위의 CPU에서도 

4vs4 풀방에 때거지로 나오는 상황에선 비슷하단 결론, (스랜디는 6명이 풀방)

쾌적한 플레이를 위해 옵션타협 할 수 밖에 없는...  


배틀필드4 실행소감은 놀라움! 오오 3DMark11결과값과 스타크래프트2 최고옵션에서 실망했던 점이 말끔이 없어졌다.

정말 평균 60프레임 꾸준히 뽑아줌, 간혹 프레임 드랍이 일어날때도 있긴 하였으나 플레이시 그리 거슬리지 않았다.

아 내일 출근만 아님 계속하고 싶었던 마음을 달래며 내일을 기약하고 취침에 들어갔다.


CPU인 Q9650이 4세대전 모델인데 (켄츠필드-요크필드-린필드-샌디브릿지-아이비브릿지-하스웰)

베필4 실행시 CPU가 VGA 발목잡을 까봐 내심 걱정했는데 플레이 하기에 그리 지장있는 정도는 아니였다.


옵션 최고로 맞춘 상태에서 나름 부드럽게 진행가능했다.

아쉬운점은 배틀필드4를 8800GTX인 상태로 실행을 못시켜봐서 이전카드와 퍼포먼스 비교를 할수 없었다.


툼레이더는 아직 실행전


첫실행을 하고나서 드는 생각은 시스템을 다시 구성해야겠다라는 점,

아무래도 3DMark11 이넘의 벤치마크 결과값이 맘에 걸린다, 물론 점수놀이긴 하지만 CPU가 밸런스가 너무 안맞는 것 같다.

보통 하스웰로 돌린값이 P14000대 이던데 P10000점을 못넘기니, 물리점수 컴바인드점수 ㅠ_ㅠ


역시 세대를 거스를순 없는 것 같다. :-)

CPU+메인보드+RAM을 구입해야 될 것 같다. 


'hardware' 카테고리의 다른 글

MACBOOK PRO (15-inch, Mid 2012) MD103 구입  (0) 2014.05.20
keyboard sticker  (0) 2014.05.16
DELL U2412M monitor OSD MENU configuration  (0) 2014.03.06
PHXUSB HEADPHONES  (0) 2014.02.18
4TRAK controller with BAG  (0) 2014.02.18
Posted by 에시드 :